This article explains how to live stream Warcraft II on Twitch.tv using Open Broadcaster Software (OBS). OBS is the best streaming software available. It’s better than XSplit and FFSplit, and it’s free.
Initial Setup
- If you don’t already have a Twitch.tv account register here.
- Download Open Broadcaster Software and install it. If you get a prompt about DirectX click “Yes”, download the file from the page it brings you to, run it, wait for it to install, then run the Open Broadcaster Software installer again.
Next, you have to set up a capture device in order to capture Warcraft 2. Set up Capture Device 1 for Windows Vista & Windows 7, or Capture Device 2 for Windows 8 & 10. Don’t set up both.
Capture Device 1: UScreenCapture
For: Windows Vista & Windows 7.
- Download UScreenCapture and install it.
- Download uscreencapprog_remove_cursor.zip. Open it, go inside the folder “uscreencapprog” inside the zip archive, go to C:\Program files (x86)\UnrealStreaming\UScreenCapture and copy+paste the files inside “uscreencapprog” there. This is required to fix colors. If you did it right it will ask you to replace some files – replace them.
- Make sure you’re running the 32 bit version of OBS (there is a different shortcut for it). In the OBS main window right click in the empty space below “Sources”, select Add > Video Capture Device and enter “UScreenCapture” as the name. In the Device drop-down menu select “UScreenCapture” (pictured below). If it doesn’t show up either you installed it wrong or you’re not running the 32 bit version of OBS.
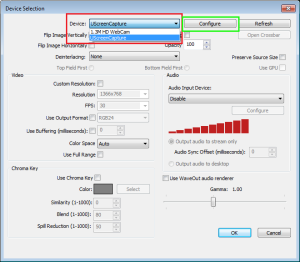
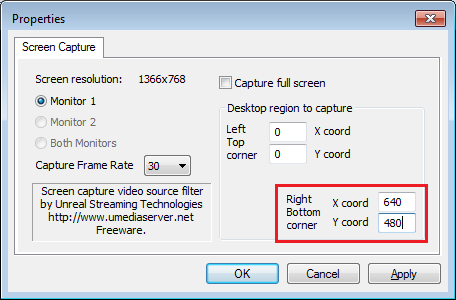
- After selecting “UScreenCapture” as the device, click the “Configure” button next to it. Enter 640×480 as the coordinates in the bottom right-hand boxes, like so:
- Next, download uscreencapture.reg, double click it and select “Yes” for all the prompts. This will fix the solid black/red square problem. Doing this step is required every time you change the resolution.
Now proceed to the “Once the capture device is set up” part of the guide below.
Troubleshooting:
- If there’s a solid red or black square, you didn’t do the uscreencapture.reg step right.
- If colors are wrong, you didn’t do the uscreencapprog_remove_cursor.zip step right.
Capture Device 2: OBS Monitor capture
For: Windows 8 & 10.
- Make sure you’re running the 32 bit version of OBS (there is a different shortcut for it). In the OBS main window right click in the empty space below “Sources”, select Add > Monitor Capture and enter “Monitor Capture” as the name.

- Uncheck the box beside “Capture mouse cursor” then click “OK”
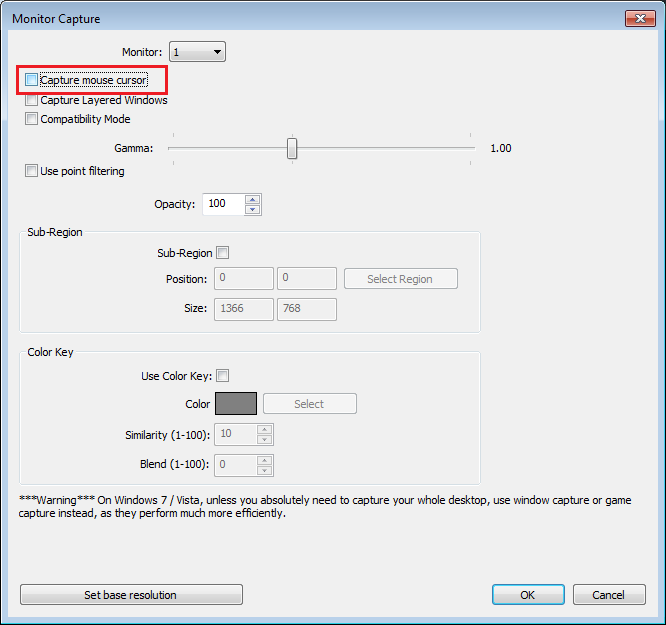
You’re done! Proceed to the next section.
Once the capture device is set up
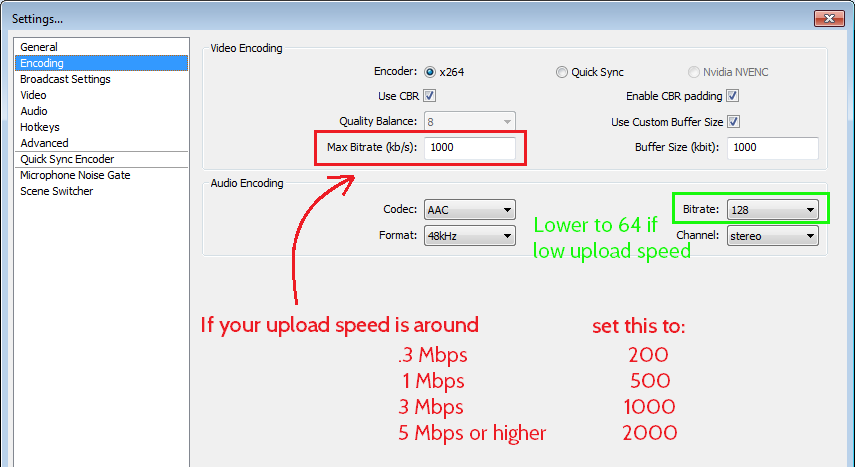
- Go to Speedtest.net, run a test, and make a note of your upload speed. Your UPLOAD speed is what matters! Your download speed doesn’t matter, so ignore it.
- In the OBS main window click Settings and select “Encoding” on the left. In this tab you can set the bitrate of your stream. Higher bitrate means better quality but also more lag. If you have a newer PC, you can switch to QuickSync for higher performance.
- Select “Broadcast Settings”, then go to this page and click the “Copy” button to copy your stream key to the clipboard. (Note: your stream key isn’t your Twitch password! You must get it from the linked page!) Once you have it, fill out the fields as shown below:
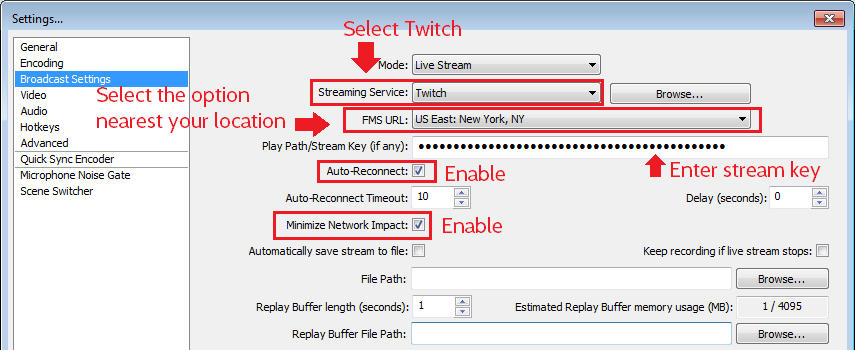 You can optionally enter 60 – 120 in the “Delay” box to delay your stream 1 – 2 minutes (useful e.g. when playing tournies or other highly competitive matches) but leaving delay at 0 is generally better to give your audience the best viewing experience.
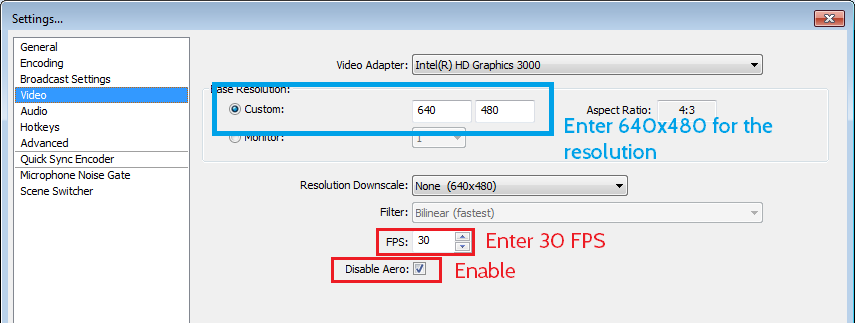
 - Select “Video” and enter 640×480 as the resolution. Note that your stream will be cut off when streaming the desktop, but when streaming Warcraft 2 it’ll be perfect. (For Windows 8 & 10 do NOT change the resolution – use the default in OBS.)
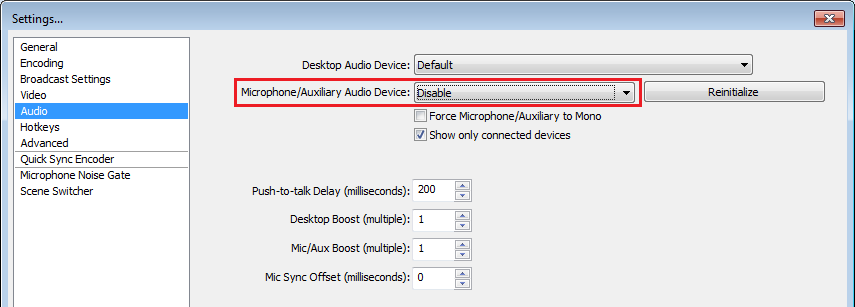
- Select “Audio”. If you have a microphone you can enable or disable it here. When disabled the microphone volume bars will appear grayed out in the main OBS window.
- Select “Advanced” and adjust the following settings:
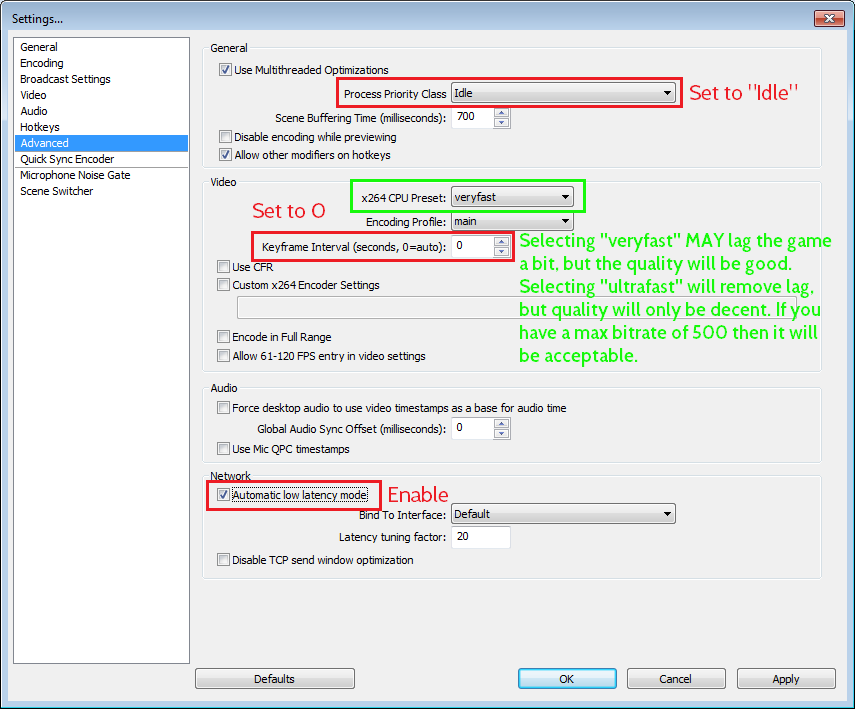 If you enabled Quick Sync in the “Encoding” tab, in the “Advanced” tab you should adjust the Quick Sync preset to “Balanced” (the default is “Best Quality” which will probably lag you).
 - Click “OK” to exit the Settings window, then click on “Preview Stream” to preview your stream. You should see the upper left-hand corner of your desktop – this is normal. (When playing Warcraft 2 the game will display perfectly.) If everything looks good, then click on “Stop Preview”.
You’re now ready to stream! You can click on “Start Stream” to begin streaming, or set up custom hotkeys under Settings > Hotkeys.
Saving your broadcasts
For Twitch to save your videos you must click this link to enable the “Store past broadcasts” feature in your account. Once enabled Twitch will save all your past broadcasts for two weeks after the live stream date.

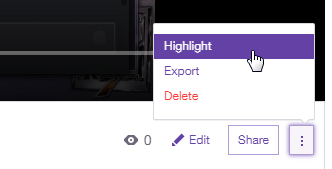
During that time you can “Highlight” or “Export them” — Highlight lets you select all or a portion of a video to save forever on Twitch, and Export sends the video to your linked YouTube account. (You can also export Highlights after you create them!)
If you’ve adjusted your settings based on the guide above and your stream still lags try using iL’s CPU Savior app. Download, unzip, and run the app & leave it running while you play. (Must start it every time before you start playing.)
If you receive an error message about DirectX then your computer will not be able to run OBS — try our alternate guide for FFsplit instead!
Don’t forget to give your Twitch channel & Warcraft 2 usernames to mousetopher so your stream shows up on War2TV!
Optional step: Advertise War2.ru in your stream
An optional last step is to add a text overlay to your stream advertising War2.ru.
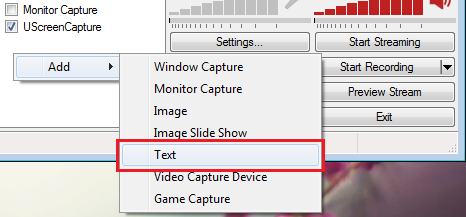
- Right click in the Sources window and select Add > Text and enter “Text” as the name.
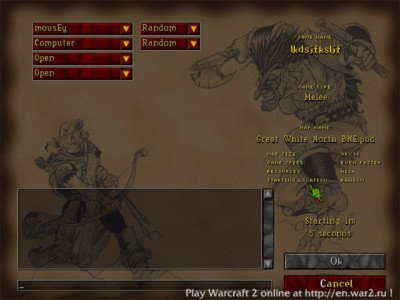
- Enter the text “Play Warcraft 2 online at http://en.war2.ru” or similar. Select the size, color & placement you want for the text. (I use these settings to add an unobtrusive yet visible overlay to the bottom right-hand corner.)
- Help support the community. Thanks!


*twidles thumbs*
are you able to do it on youtube and if not will then you should make it so it will be able stream on youtube
Should work on Youtube, yes, but this guide is specific to Twitch.tv which is the only streaming service I’ve used. I’d guess everything would be set up the same, but for step #3 select “Youtube” as the service and enter whatever API/stream key they provide in your account.
Hi,
Is it a possibility, that you could describe and display the method for streaming Warcraft 2, with the new 32-bit version of OBS? I wonderingly discovered that the developers have expanded the capabilities, and, thereof, embedded (or brought) a number of new options and settings, within the interface of the software.
I certainly hope, that you wish to accomodate my desire.
Kind regards
Christian
hi Christian, sorry I completely missed your comment. You should be able to follow this guide with the new OBS studio version since all the settings should be approximately the same, the layout is just a little different.
Excellent tutorial! I have a quick question though. I’m running Warcraft II on somewhat of a prehistoric system running Windows XP 32-bit. I’m not interested in live streaming, but I’m really wanting to do some in-game video recording. Any thoughts on how to do this? Thank you in advance.
Specs:
Celeron CPU 2.53GHz
2.52 GHz 2GB of RAM
Windows XP Professional SP3, Version 2002
Why the ancient computer? Because I’m poor. (lol)
hi Alan, there’s two apps specifically for recording war2 replays —
1. warvideo, which records game lobby, gameplay from your POV, all player chat etc, & stats screen, and does not record sound. replays can only be viewed in the warvideo app, so this is useful if you want the replays for yourself or to share with other players, but not to upload to any video site (would have to record a video of the replay playback to do that)
2. war2insight, which records the entire game and everything that happens in it (but not player chat). can only be played back in the game itself, i.e. you load the insight replay, then host a game using the correct map & settings, then start the game, and then watch the game play out in real time with the ability to click on any player’s units and see their stats etc. this is useful if you want to see what your opponents are doing, and the replay files also have much smaller file size than warvid
both are available at the downloads page. http://en.war2.ru/downloads if you’re interested in uploading the replays online then you can also check this tutorial for hypercam2 which probably works on your old pc: http://forum.war2.ru/index.php/topic,764.0.html